BCDR - The Emergency Data Centre from the Cloud Part 2
In the first part of our blog series on the topic of BCDR - the emergency data centre from the cloud, we introduced you to the "Azure Site Recovery" service and its advantages. In the second part, we will show you the first steps for using the service and give you tips and tricks along the way.
Start with the right strategy
As part of your BCDR strategy, you should start by defining your desired RPOs and RTOs for your business applications. Here, it is actually advisable to assess the impact for each individual business application and divide RPOs and RTOs into different classes. The corresponding classes should then contain different target values for the RPOs and RTOs. If you generalise, there is a great danger that you will build up unnecessarily expensive BCDR strategies here.

To prepare for the use of Azure Site Recovery
Good preparation often determines the success or failure of projects. For preparation when using the "Azure Site Recovery" service, you should at least check the following points:
- Network requirements
For the services to function, it goes without saying that data must be exchanged. Accordingly, there are requirements for your network requirements.
The data transport takes place via port 9443 and the orchestration via port 443. Furthermore, you should make sure that the configuration server in VMware gets the NIC type VMXNET3.
Of course, a wide variety of URL releases are also necessary. These can be found in the documentation of the service.
This link will provide you with further information on the provision of a configuration server.
- Azure account authorisation verification
If you are not the subscription administrator of your Azure environment, you should ensure that you have at least the following roles:
· Virtual Machine Contributor
· Site Recovery Contributor
After these preparations, you should have done the most necessary to start with the first steps.
- Prepare Azure Site Recovery
To get started with the setup, first create a Recovery Services Vault. When creating it, select your subscription and either create a dedicated resource group or use an existing one. The last thing you need to do is decide on a region. Furthermore, you need a virtual Azure network. It is recommended that you select the same parameters (subscription, resource group, region) as in the previous step.
- Prepare VMWare locally
"Azure Site Recovery" requires at least one account with read permission on your VMWare environment to be able to automatically detect the virtual machines.For the orchestration of replication, failover and failback, the Azure Site Recovery Service also requires permission to perform operations such as creating and removing disks, as well as powering on virtual machines.It is recommended to have an extra account at vCenter level with the appropriate name for this.
The corresponding necessary permissions can be found in this table.
- Preparing an account for the installation of the Mobility Service
The so-called mobility service must be installed on all (virtual) servers that you want to replicate. The easiest way to do this is via a push installation. This can be done when activating "Azure Site Recovery" for the servers.You need a correspondingly authorised user for this.You have the choice of using a domain user, which can then perform this accordingly on all domain servers, or you use individual local users.
A corresponding superuser must be created for virtual Linux computers.
- Disaster Recovery Architecture
Once you have made all the previous preparations, you can now start and install the necessary servers that will secure your environment in the future.
Depending on which hypervisor you use or whether you also or exclusively want to secure physical servers, the architectures for disaster recovery differ.
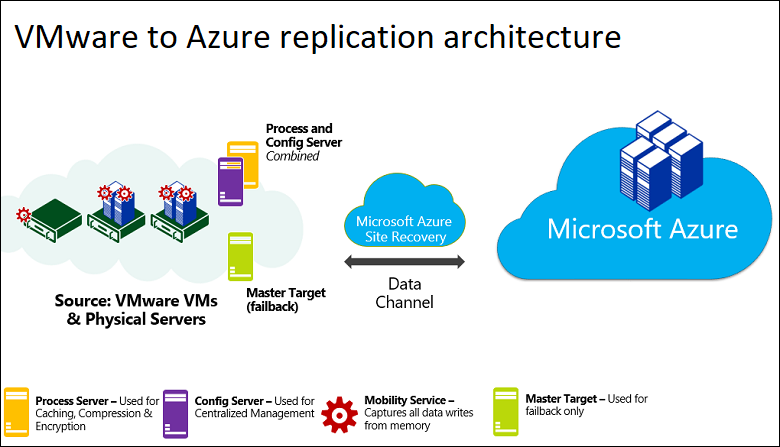
The following graphic shows the Microsoft reference architecture for the recovery of VMWare machines and physical servers.

Microsoft reference architecture for VMWare machine and physical server recovery, source: Microsoft GER
The configuration server (purple) coordinates the communication between the local environment and Azure and manages the data replication.
The process server (orange), which is often installed on the configuration server by default, receives the replication data, optimises it by caching, compresses and encrypts it and sends it to the Azure storage. Furthermore, the server is responsible for installing the "Azure Site Recovery" mobility services on the virtual machines you want to replicate. In addition, it performs an automatic discovery on local computers. Depending on the size of your environment, it is recommended to install several process servers to handle larger amounts of replication traffic.
The master target server (green), which is also installed on the configuration server by default, processes the replication data during a failback of Azure. As with the process server, another master target server should be used in larger environments.
To find the optimal disaster recovery architecture, Microsoft provides good support with the Azure Site Recovery deployment planner.
An OVA file for the deployment of the different server roles can be found here.
To Summarise
In short, you have now completed all the necessary steps to create an initial failover plan and are thus about to secure your environment. The most important thing here is the routing. As you can see, the effort to set up "Azure Site Recovery" is manageable up to this point. Depending on the complexity of your environment and any "hard" programmed IP addresses within your applications, the effort can increase even with "Azure Site Recovery" in the subsequent activities. Nevertheless, from our point of view, the fast progress and the pure software solutions are definitely on the plus side of this BCDR option and is therefore also our recommendation for you.
Your Contact
Do you have questions on this topic, would you like more information and are you looking for an expert to help you?
Contact us! We look forward to a successful cooperation with you.

Our partners
All partners


